How to Use Supabase with Next.js: Auth, Database & Storage
Introduction
If you're building a modern web app with Supabase Next.js integration, you've made an excellent choice. Supabase is an open-source backend platform that gives developers a PostgreSQL database, authentication, file storage, and real-time subscriptions — all in one place. Paired with Next.js, it creates a powerful full-stack setup that's fast to ship and easy to maintain.
In this tutorial, you'll learn everything you need to go from zero to a production-ready Supabase integration in your Next.js app. Whether you're a solo founder building a SaaS product or a developer exploring modern backend options, this guide covers it all.
What You'll Build in This Tutorial
By the end of this article, you'll have hands-on experience with:
- Setting up a Supabase project and connecting it to Next.js
- Performing full CRUD operations on a Supabase PostgreSQL database
- Implementing email/password and Google OAuth authentication
- Uploading and managing files using Supabase Storage
- Subscribing to real-time database changes
Why Use Supabase with Next.js
Next.js is the leading React framework for building full-stack applications. Supabase acts as the perfect backend companion — it's developer-friendly, open-source, and eliminates the need to build your own API for common tasks like auth and file uploads. Together, they dramatically reduce the time from idea to production.
What Is Supabase?
Supabase is an open-source Firebase alternative built on top of PostgreSQL. It provides a suite of backend tools through a clean dashboard and a JavaScript SDK, allowing developers to spin up a production-grade backend without writing server-side code for most use cases.
Key Features of Supabase
- Supabase PostgreSQL Database — A fully managed Postgres instance with a visual table editor
- Supabase Auth — Built-in authentication supporting email/password, magic links, and OAuth providers
- Supabase Storage — File and image storage with public/private bucket support
- Supabase Realtime — WebSocket-based real-time subscriptions for database changes
- Edge Functions — Deploy serverless functions close to your users
- Auto-generated REST and GraphQL APIs — Instant APIs based on your database schema
 The Supabase project dashboard showing the Table Editor, Storage, Auth, and SQL Editor in the left-hand navigation.
Why Developers Choose Supabase
Supabase offers a generous free tier, a clean developer experience, and the power of PostgreSQL — a battle-tested relational database. The JavaScript SDK is intuitive, the dashboard is polished, and the documentation is thorough. Indie hackers and SaaS founders love it because they can launch an MVP without managing infrastructure.
Supabase as a Firebase Alternative
Firebase is Google's popular backend-as-a-service platform, but it uses NoSQL (Firestore) and a proprietary lock-in. Supabase offers a relational alternative using standard SQL, making it easier to migrate, query complex data, and join tables.
Section Summary: Supabase is a powerful, open-source backend platform built on PostgreSQL. It's a compelling alternative to Firebase for developers who prefer SQL and open standards.
Prerequisites
Before diving in, make sure you have the following in place.
Node.js Requirements
You need Node.js 18.x or later installed. You can verify your version by running:
node -v
Next.js Project Setup
If you don't have a Next.js project yet, create one:
npx create-next-app@latest my-supabase-app cd my-supabase-app
During setup, select TypeScript, App Router, and Tailwind CSS if you want modern defaults. This tutorial uses the App Router (Next.js 13+).
Supabase Account Setup
Head to supabase.com and create a free account. The free tier gives you two projects, 500 MB of database storage, 1 GB of file storage, and up to 50,000 monthly active users for auth.
Creating a Supabase Project
Creating a New Project
After logging in to the Supabase dashboard:
- Click New Project
- Select your organization
- Enter a project name and a strong database password
- Choose a region close to your users
- Click Create new project and wait about 60 seconds for provisioning
Understanding the Supabase Dashboard
The dashboard gives you access to:
- Table Editor — Visual interface to manage your database tables
- Authentication — Configure providers and view users
- Storage — Manage file buckets
- SQL Editor — Run raw SQL queries
- API Settings — Get your project credentials
Getting Project URL and API Keys
Navigate to Project Settings → API. You'll find:
- Project URL — Your unique Supabase endpoint (e.g.,
https://xyz.supabase.co) - anon/public key — Safe to expose in the browser; respects Row Level Security
- service_role key — Bypasses RLS; never expose this on the client side
Section Summary: Creating a Supabase project takes under two minutes. Keep your API keys handy — you'll need them to connect your Next.js app.
Setting Up Supabase in Next.js
Installing the Supabase Client
Install the official Supabase packages:
npm install @supabase/supabase-js @supabase/ssr
The @supabase/ssr package is specifically designed for server-side rendering environments like Next.js App Router and handles cookie-based session management properly.
Configuring Environment Variables
Create a .env.local file in the root of your project:
NEXT_PUBLIC_SUPABASE_URL=https://your-project-ref.supabase.co NEXT_PUBLIC_SUPABASE_ANON_KEY=your-anon-key
Variables prefixed with NEXT_PUBLIC_ are exposed to the browser. Never store your service_role key here.
Creating the Supabase Client
Create a lib/supabase.ts file:
// lib/supabase.ts import { createClient } from '@supabase/supabase-js'; const supabaseUrl = process.env.NEXT_PUBLIC_SUPABASE_URL!; const supabaseAnonKey = process.env.NEXT_PUBLIC_SUPABASE_ANON_KEY!; export const supabase = createClient(supabaseUrl, supabaseAnonKey);
For the App Router with server components, use @supabase/ssr to create server-side and client-side clients separately:
// lib/supabase/server.ts import { createServerClient } from '@supabase/ssr'; import { cookies } from 'next/headers'; export function createClient() { const cookieStore = cookies(); return createServerClient( process.env.NEXT_PUBLIC_SUPABASE_URL!, process.env.NEXT_PUBLIC_SUPABASE_ANON_KEY!, { cookies: { getAll() { return cookieStore.getAll(); }, setAll(cookiesToSet) { cookiesToSet.forEach(({ name, value, options }) => cookieStore.set(name, value, options) ); }, }, } ); }
Project Structure
A clean structure for a Supabase + Next.js project:
my-supabase-app/
├── app/
│   ├── auth/
│   │   ├── login/page.tsx
│   │   └── register/page.tsx
│   ├── dashboard/page.tsx
│   └── page.tsx
├── lib/
│   ├── supabase/
│   │   ├── client.ts
│   │   └── server.ts
├── components/
└── .env.local
 Recommended Next.js project structure showing the
 lib/supabase folder, app/auth routes, and .env.local at the root.
Section Summary: Supabase setup in Next.js takes just a few lines. The key is using
@supabase/ssrfor the App Router to ensure sessions persist correctly across server and client components.
Working with a Supabase Database
Understanding Supabase PostgreSQL
Supabase gives you a real PostgreSQL database — not a proprietary NoSQL store. That means you get full SQL power: JOINs, transactions, stored procedures, and extensions like pgvector for AI use cases. The Supabase client wraps this with a convenient query builder so you rarely need to write raw SQL for simple operations.
Creating a Database Table
In the Table Editor, click New Table and create a posts table with these columns:
| Column | Type | Default |
|---|---|---|
| id | uuid | gen_random_uuid() |
| title | text | — |
| content | text | — |
| user_id | uuid | — |
| created_at | timestamp | now() |
Or use the SQL Editor:
CREATE TABLE posts ( id UUID DEFAULT gen_random_uuid() PRIMARY KEY, title TEXT NOT NULL, content TEXT, user_id UUID REFERENCES auth.users(id), created_at TIMESTAMP WITH TIME ZONE DEFAULT NOW() );
Inserting Records
const { data, error } = await supabase .from('posts') .insert([{ title: 'Hello Supabase', content: 'My first post', user_id: userId }]) .select(); if (error) console.error(error); else console.log(data);
Reading Data
// Fetch all posts const { data: posts, error } = await supabase .from('posts') .select('*') .order('created_at', { ascending: false }); // Fetch a single post by ID const { data: post } = await supabase .from('posts') .select('*') .eq('id', postId) .single();
Updating Records
const { data, error } = await supabase .from('posts') .update({ title: 'Updated Title' }) .eq('id', postId) .select();
Deleting Records
const { error } = await supabase .from('posts') .delete() .eq('id', postId);
Section Summary: The Supabase JavaScript client provides a clean, chainable query builder for all standard CRUD operations on your PostgreSQL tables.
Implementing Supabase Authentication
What Is Supabase Auth?
Supabase Auth is a fully managed authentication system built on top of PostgreSQL's auth schema. It handles JWTs, session tokens, email confirmation, password resets, and third-party OAuth — all without you writing a single auth endpoint.
Email and Password Authentication
Enable Email provider in Authentication → Providers in the Supabase dashboard.
User Registration
// app/auth/register/page.tsx 'use client'; import { useState } from 'react'; import { supabase } from '@/lib/supabase/client'; export default function RegisterPage() { const [email, setEmail] = useState(''); const [password, setPassword] = useState(''); const [message, setMessage] = useState(''); const handleRegister = async () => { const { error } = await supabase.auth.signUp({ email, password }); if (error) setMessage(error.message); else setMessage('Check your email to confirm your account!'); }; return ( <div> <input type="email" value={email} onChange={(e) => setEmail(e.target.value)} placeholder="Email" /> <input type="password" value={password} onChange={(e) => setPassword(e.target.value)} placeholder="Password" /> <button onClick={handleRegister}>Register</button> {message && <p>{message}</p>} </div> ); }
User Login
const handleLogin = async () => { const { error } = await supabase.auth.signInWithPassword({ email, password }); if (error) setMessage(error.message); else router.push('/dashboard'); };
User Logout
const handleLogout = async () => { await supabase.auth.signOut(); router.push('/'); };
Protecting Routes
Use a middleware file at the root of your project to protect routes:
// middleware.ts import { NextResponse } from 'next/server'; import type { NextRequest } from 'next/server'; import { createServerClient } from '@supabase/ssr'; export async function middleware(request: NextRequest) { const response = NextResponse.next(); const supabase = createServerClient( process.env.NEXT_PUBLIC_SUPABASE_URL!, process.env.NEXT_PUBLIC_SUPABASE_ANON_KEY!, { cookies: { getAll: () => request.cookies.getAll(), setAll: () => {} } } ); const { data: { user } } = await supabase.auth.getUser(); if (!user && request.nextUrl.pathname.startsWith('/dashboard')) { return NextResponse.redirect(new URL('/auth/login', request.url)); } return response; } export const config = { matcher: ['/dashboard/:path*'] };
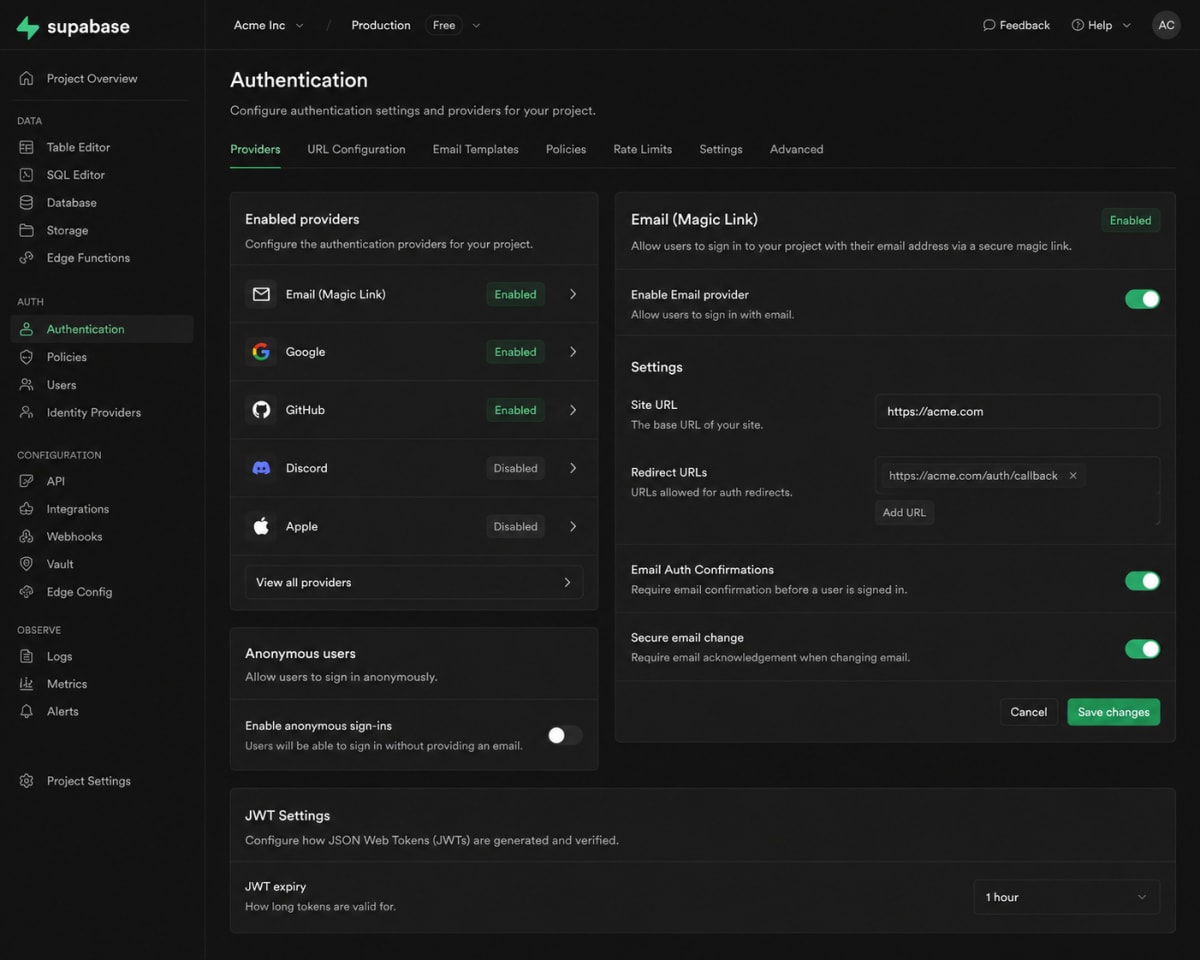 The Supabase Authentication settings panel showing enabled providers and user management.
Section Summary: Supabase Auth handles the full authentication lifecycle. Combined with Next.js middleware, you can easily protect server-rendered routes without any additional libraries.
Adding Google Authentication
Enabling Google Auth Provider
In the Supabase dashboard, go to Authentication → Providers and enable Google.
Configuring OAuth Credentials
- Go to Google Cloud Console
- Create a new project or use an existing one
- Navigate to APIs & Services → Credentials
- Create an OAuth 2.0 Client ID (Web application)
- Add your Supabase callback URL as an authorized redirect URI:
https://your-project-ref.supabase.co/auth/v1/callback - Copy the Client ID and Client Secret into Supabase's Google provider settings
Implementing Google Login in Next.js
const handleGoogleLogin = async () => { const { error } = await supabase.auth.signInWithOAuth({ provider: 'google', options: { redirectTo: `${window.location.origin}/auth/callback`, }, }); if (error) console.error('Google login error:', error.message); }; // In your component <button onClick={handleGoogleLogin}> Sign in with Google </button>
Create the OAuth callback route:
// app/auth/callback/route.ts import { createClient } from '@/lib/supabase/server'; import { NextResponse } from 'next/server'; export async function GET(request: Request) { const { searchParams, origin } = new URL(request.url); const code = searchParams.get('code'); if (code) { const supabase = createClient(); await supabase.auth.exchangeCodeForSession(code); } return NextResponse.redirect(`${origin}/dashboard`); }
Section Summary: Supabase Google Auth requires minimal setup — configure the OAuth credentials in Google Cloud and Supabase, then call
signInWithOAuth. Supabase handles the redirect and token exchange automatically.
Using Supabase Storage
Creating Storage Buckets
In Storage → Buckets, click New Bucket. Name it avatars and choose whether it's public (anyone can read) or private (requires authentication).
Uploading Images
const handleUpload = async (file: File) => { const fileName = `${Date.now()}-${file.name}`; const { data, error } = await supabase.storage .from('avatars') .upload(fileName, file, { cacheControl: '3600', upsert: false, }); if (error) { console.error('Upload error:', error.message); return; } console.log('Uploaded:', data.path); };
Displaying Uploaded Images
For public buckets, get the URL directly:
const { data } = supabase.storage .from('avatars') .getPublicUrl('my-image.png'); // data.publicUrl = "https://xyz.supabase.co/storage/v1/object/public/avatars/my-image.png"
For private buckets, generate a signed URL:
const { data, error } = await supabase.storage .from('avatars') .createSignedUrl('my-image.png', 60); // Expires in 60 seconds
Managing Public and Private Files
Use public buckets for assets like product images or blog thumbnails. Use private buckets for user-uploaded content that requires authentication. Row Level Security policies apply to storage as well, so you can restrict uploads and reads by user.
Deleting Files
const { error } = await supabase.storage .from('avatars') .remove(['my-image.png', 'old-avatar.jpg']); if (error) console.error('Delete error:', error.message);
The Supabase Storage panel showing a public bucket named "avatars" with uploaded files.
Section Summary: Supabase Storage makes file management straightforward. Use public buckets for static assets and private buckets with signed URLs for protected user content.
Using Supabase Realtime Features
What Is Supabase Realtime?
Supabase Realtime is a Phoenix-based WebSocket server that listens to PostgreSQL's logical replication log and broadcasts changes to connected clients. This enables you to build live feeds, collaborative tools, notifications, and dashboards — all without polling.
Listening for Database Changes
First, enable replication on your table in the Supabase dashboard: Database → Replication and toggle your table on.
'use client'; import { useEffect, useState } from 'react'; import { supabase } from '@/lib/supabase/client'; type Post = { id: string; title: string; content: string }; export default function LiveFeed() { const [posts, setPosts] = useState<Post[]>([]); useEffect(() => { // Initial fetch const fetchPosts = async () => { const { data } = await supabase.from('posts').select('*').order('created_at', { ascending: false }); if (data) setPosts(data); }; fetchPosts(); // Subscribe to real-time changes const channel = supabase .channel('posts-channel') .on( 'postgres_changes', { event: '*', schema: 'public', table: 'posts' }, (payload) => { if (payload.eventType === 'INSERT') { setPosts((prev) => [payload.new as Post, ...prev]); } else if (payload.eventType === 'DELETE') { setPosts((prev) => prev.filter((p) => p.id !== payload.old.id)); } else if (payload.eventType === 'UPDATE') { setPosts((prev) => prev.map((p) => (p.id === payload.new.id ? (payload.new as Post) : p))); } } ) .subscribe(); return () => { supabase.removeChannel(channel); }; }, []); return ( <ul> {posts.map((post) => ( <li key={post.id}>{post.title}</li> ))} </ul> ); }
Updating UI in Real Time
The subscription callback receives INSERT, UPDATE, and DELETE events with payload.new and payload.old data. By updating React state inside the callback, your UI reflects database changes instantly across all connected clients — no page refresh needed.
 Supabase Realtime dashboard showing active channels and live database change events.
Section Summary: Supabase Realtime turns your PostgreSQL database into a live data source. With just a few lines of code, you can build collaborative, event-driven UIs that update instantly.
Security Best Practices
Environment Variables
Always store credentials in .env.local. The NEXT_PUBLIC_ prefix exposes variables to the browser, so only use it for the anon key and project URL. The service_role key should only ever be used in server-side code (API routes or Server Actions) and must never be prefixed with NEXT_PUBLIC_.
Row Level Security (RLS)
Enable RLS on every table that contains user data. Without RLS, anyone with your anon key can read all rows. A basic policy to restrict users to their own data:
-- Enable RLS ALTER TABLE posts ENABLE ROW LEVEL SECURITY; -- Allow users to read only their own posts CREATE POLICY "Users can view own posts" ON posts FOR SELECT USING (auth.uid() = user_id); -- Allow users to insert their own posts CREATE POLICY "Users can insert own posts" ON posts FOR INSERT WITH CHECK (auth.uid() = user_id);
 The Supabase Table Editor showing Row Level Security enabled with SELECT and INSERT policies configured for a
 posts table.
API Key Management
Only use the anon key in client-side code. Use the service_role key exclusively in server-side contexts where you need to bypass RLS (e.g., admin operations). Rotate keys if they're ever exposed.
Protecting User Data
Use auth.uid() in your RLS policies to scope data to the authenticated user. Combine this with foreign key constraints linking user_id to auth.users(id) to enforce data integrity at the database level.
Section Summary: Security in Supabase starts with enabling Row Level Security and using the correct API keys in the right contexts. Never skip RLS on tables containing user-specific data.
Common Use Cases
Authentication Systems
Supabase Auth is production-ready for most authentication needs. Email/password, magic links, and OAuth with providers like Google, GitHub, and Twitter are all supported out of the box.
SaaS Applications
With PostgreSQL, RLS, and multi-tenant data patterns, Supabase is an excellent backend for SaaS products. You can segment data per organization or user and enforce access control entirely at the database level.
Blog Platforms
The Supabase database handles posts, categories, authors, and comments with standard relational tables. Combine with Supabase Storage for image uploads and Next.js static generation for blazing-fast public pages.
Admin Dashboards
Supabase's auto-generated REST API and the JavaScript client make it easy to build internal dashboards. Row Level Security can be configured to give admin users broader access while restricting regular users.
Common Issues and Solutions
Authentication Errors
Problem: Invalid login credentials even with correct email/password.
Solution: Ensure email confirmation is either disabled (for development) or the user has clicked the confirmation link. Check Authentication → Settings → Email Confirmation.
Storage Upload Problems
Problem: new row violates row-level security policy when uploading.
Solution: Add a storage policy to allow authenticated users to upload. In Storage → Policies, create an INSERT policy: auth.uid() IS NOT NULL.
Database Connection Issues
Problem: Queries return null data without errors.
Solution: Verify your .env.local values are correct and that the environment variables are being loaded (console.log(process.env.NEXT_PUBLIC_SUPABASE_URL) in development to verify).
Environment Variable Mistakes
Problem: The Supabase client initializes with undefined values.
Solution: Restart the Next.js dev server after editing .env.local. Next.js only reads environment files at startup.
Conclusion
Key Takeaways
- Supabase provides a full backend stack (PostgreSQL, auth, storage, realtime) with minimal configuration
- The
@supabase/ssrpackage is the correct choice for Next.js App Router projects - Always enable Row Level Security on tables with user data
- Use the
anonkey in client code; keep theservice_rolekey server-only - Google Auth setup requires configuring OAuth credentials in both Google Cloud and Supabase
When to Use Supabase
Choose Supabase when you want to move fast, prefer SQL over NoSQL, need built-in auth and storage, and don't want to manage a custom backend. It's ideal for SaaS products, internal tools, content platforms, and any app where PostgreSQL's relational power is a benefit rather than a constraint.
Next Steps
- Add more OAuth providers (GitHub, Twitter/X, Discord)
- Explore Supabase Edge Functions for custom server-side logic
- Implement database migrations using the Supabase CLI
- Set up a CI/CD pipeline with
supabase db pushfor schema deployments
Ready to go deeper? Explore the official Supabase documentation and the Next.js docs for the latest updates on both platforms.