The Only SendGrid Setup Guide You'll Actually Need in 2026
Every sendgrid setup guide on the first page of Google right now follows the same script. Sign up. Create an API key. Paste it in. Done. Ship it.
And then your password reset emails land in spam. Your WooCommerce order confirmations disappear. Your users assume your product is broken. You burn three hours on a Saturday crawling Stack Overflow threads, only to realise that every tutorial — including the one you followed — skipped the same two steps.
Those two steps are domain authentication and actually understanding how deliverability works. Nobody warns you about them upfront because the people writing these guides have never shipped email infrastructure to production. They've tested it locally, watched the 202 roll in, and called it a day.
We're not doing that here. This sendgrid setup guide covers the whole thing — and more importantly, it covers why each step exists, so when something breaks at midnight you're not completely in the dark.
What is SendGrid and Do You Actually Need It?
SendGrid — now officially Twilio SendGrid after the 2019 acquisition — is a cloud-based email delivery platform. It handles two things: transactional email (password resets, order confirmations, system alerts) and marketing email (newsletters, drip campaigns, broadcast blasts). Most developers care about the first. Most marketers care about the second. The platform tries to serve both simultaneously, which means it's occasionally excellent at both and occasionally confusing for both.
The reason developers use SendGrid isn't features. It's deliverability. Running your own mail server means you own your IP reputation, your bounce handling, your ISP relationships, and your blocklist removal requests at 2 AM. That's a part-time job that nobody's resume said they signed up for. SendGrid absorbs all of it. They send over 100 billion emails a month. Gmail, Outlook, and Yahoo have established trust with SendGrid's sending infrastructure over years. When your app fires a password reset in the middle of the night, you want that in the inbox in under 30 seconds — not sitting in a deliverability queue you don't even know exists.
SendGrid is not a magic inbox guarantee, though. There are specific things you have to configure correctly, or you will end up in spam regardless of how well-funded the platform is. This guide covers all of them without burying the important parts in footnotes.
Skip SendGrid if:
- You're sending under 500 emails a month on a side project. Gmail SMTP or Resend's free tier gets you there without the overhead.
- You need pure marketing tooling — list segmentation, audience management, visual campaign builders. Mailchimp, ConvertKit, or Brevo are built for that. SendGrid's marketing tools feel bolted on by comparison.
SendGrid is the right call when:
- You're building a SaaS product and need reliable transactional email wired into your backend.
- You're running a WooCommerce or membership site where PHP's
mail()function has already embarrassed you at least once. - You need maintained SDK support across multiple languages. Node.js, Python, PHP, Ruby, Go, Java, and C# all have official libraries. This matters more than it sounds when you're six months in and your backend has evolved three times.
SendGrid Pricing — Real Numbers, No Marketing Spin
The pricing page is legitimately confusing the first time you read it, and a surprisingly large number of tutorials have outdated or flat-out wrong numbers. Let's fix that.
SendGrid runs two completely separate billing lines. Most developers only need one of them — but the dashboard presents them side by side in a way designed to make you subscribe to both without fully registering what you're agreeing to.
Email Marketing Plans (Campaigns)
2,000 contacts · 6,000 emails/month
5,000 contacts · 15,000 emails/month
5,000 contacts · 15,000 emails/month
The thing nobody mentions: transactional email and marketing campaigns are billed completely separately. If you want both, you pay for both. A lot of teams discover this after they've already built their onboarding flow around what they thought was one subscription.
Costs That Don't Show Up in the Headlines
- Dedicated IP: $30/month per additional IP. The first one is included in Pro.
- Overage fees: Roughly $0.00133 per email on the 50K Essentials plan once you exceed your monthly cap.
- Email Validation API: Pay-as-you-go once you've burned through Pro's included 5,000 validation credits.
- Extended log retention on Essentials: 30-day logs are a paid add-on at around $10–$15/month. The 7-day default is painful when you're debugging a deliverability issue that started 10 days ago.
The Essentials plan at $19.95/month is where most teams start, and it works — right up until you run into shared IP reputation problems. The Pro plan at $89.95/month is the honest answer for any SaaS that's past "we're launching soon." In early 2025, there were multiple documented cases of Outlook and Hotmail delivery failures caused by bad actors tanking SendGrid's shared IP pools. The affected senders had done nothing wrong. They just had terrible neighbours on a shared IP and had no recourse.
If raw cost is your biggest constraint and you're deep in the AWS ecosystem, read our Amazon SES review before committing here — at $0.10 per 1,000 emails, SES is a dramatically different price point, even if the setup complexity is a different conversation entirely.

Step 1 — Create Your SendGrid Account
Go to sendgrid.com and sign up. No credit card required for the free tier.
After creating your account, SendGrid asks for business details — company name, website URL, and a description of your intended sending use case. Most people rush through this screen. Don't. This feeds directly into SendGrid's automated compliance screening, and if your answers look vague or smell like spam intent, your account gets flagged for manual review before you send a single email. Developers who selected "email marketing" from the dropdown — because it was the first option and they weren't paying attention — have ended up waiting days for a human at SendGrid to review their ticket.
Be specific. "SaaS application transactional emails — welcome messages, password resets, usage alerts triggered by user activity" clears the automated review. "Digital marketing" does not.
Three things to handle the moment you're in the dashboard:
- Use a real business domain as your sender identity.
yourname@gmail.comas a from address is a red flag for SendGrid's compliance system and for every receiving mail server you'll ever talk to. - Complete single sender verification immediately. SendGrid requires this before you can send anything. It's a two-minute confirmation email.
- Bookmark these three sections. You'll be in them constantly: Email API → Integration Guide (API keys), Settings → Sender Authentication (domain setup), and the Activity Feed (debugging everything).
Step 2 — Domain Authentication (SPF, DKIM, DMARC)
Most tutorials either skip this entirely or summarise it in two sentences and move on. That is precisely why developers end up on Stack Overflow writing "why are my SendGrid emails going to spam" after completing every other step correctly.
Domain authentication is the most important part of this entire sendgrid setup guide. Not the API key. Not the integration code. This.
Why It Matters — What's Actually Happening Under the Hood
When your app fires a request to SendGrid's API, SendGrid's servers dispatch that email on your behalf. But those servers have IPs owned by Twilio, not by you. Gmail and Outlook see an email claiming to be from noreply@yourcompany.com that physically arrived from a Twilio-owned IP. That mismatch is a spam signal — and they act on it.
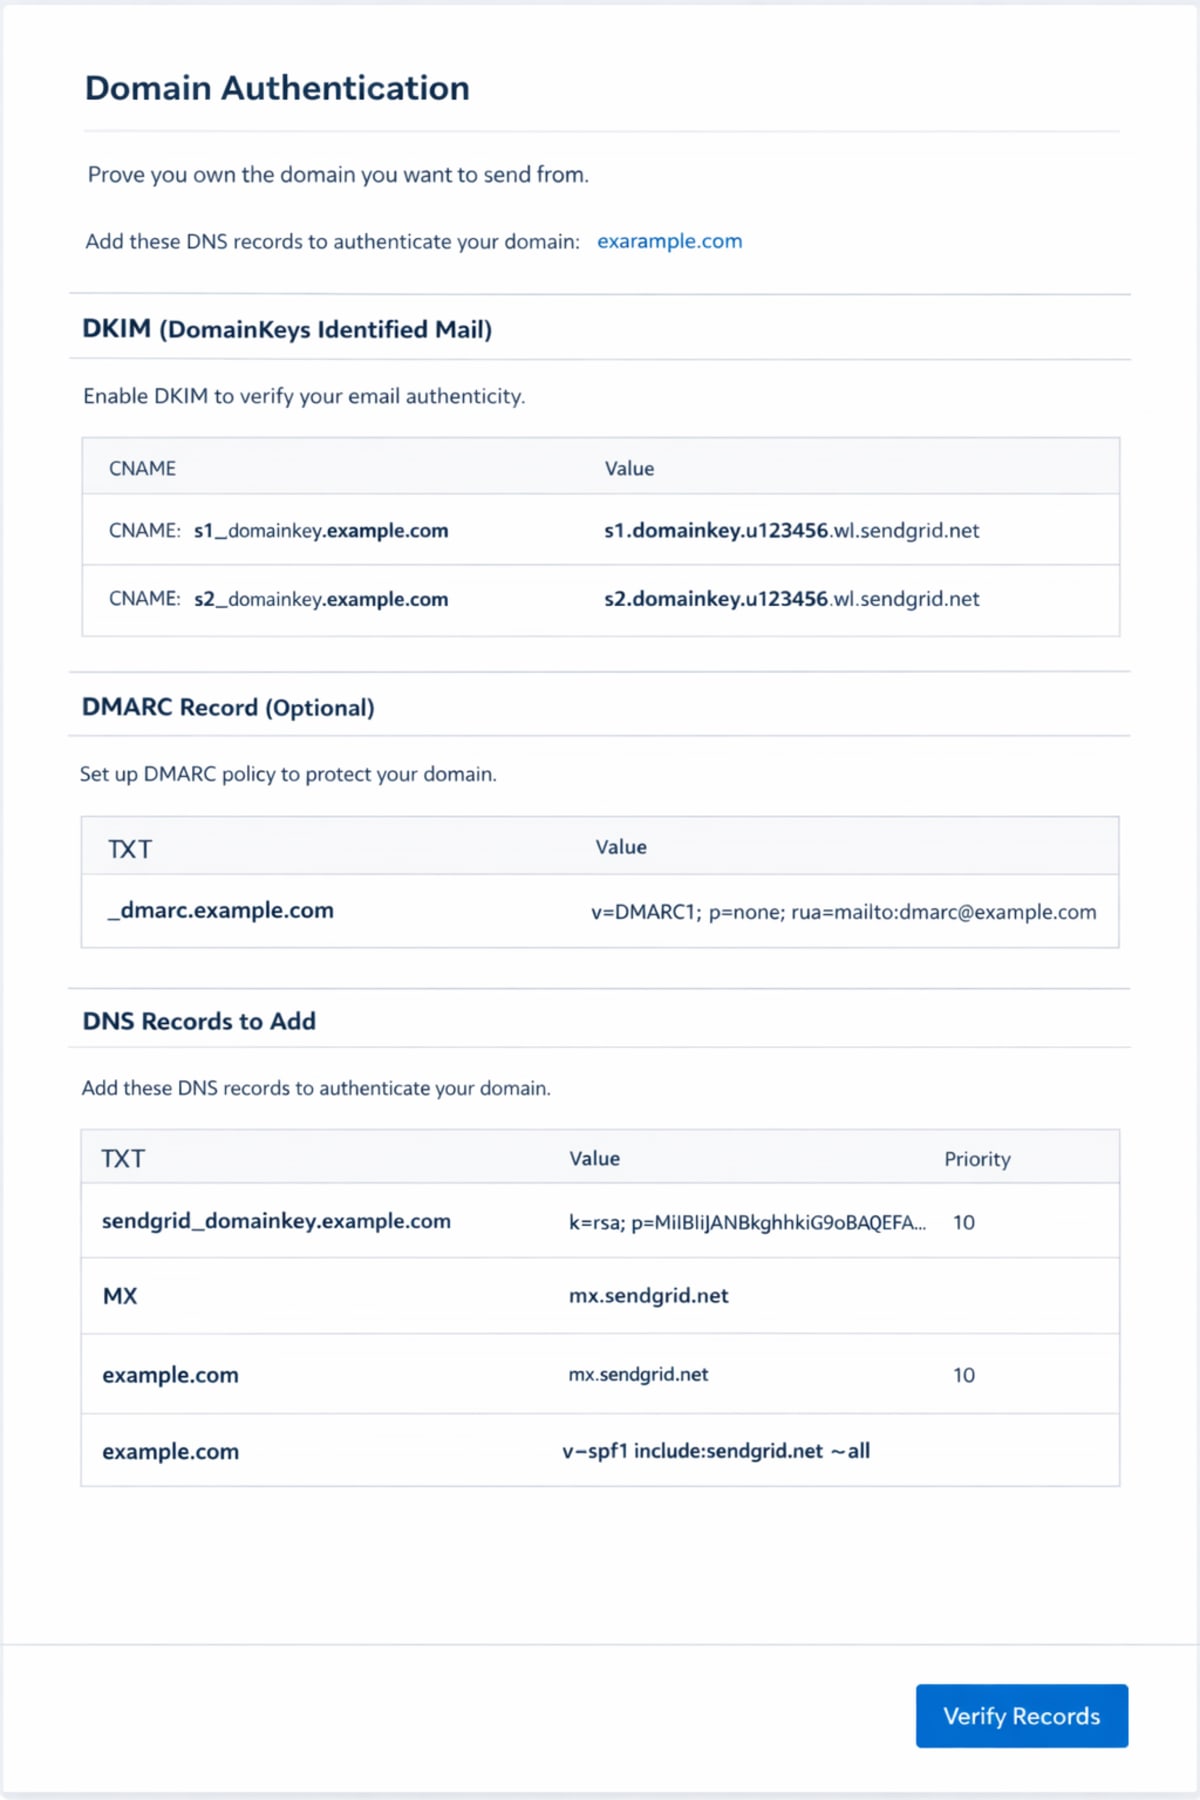
Domain authentication resolves this. It's you telling the world's mail servers — through cryptographically verifiable DNS records — that your domain explicitly authorised SendGrid to send mail on your behalf. Three protocols handle it:
- SPF: A DNS TXT record listing which servers are permitted to send email from your domain.
- DKIM: A DNS CNAME record that adds a cryptographic signature to every outgoing email. Receiving servers use your public key to verify the signature wasn't forged or tampered with in transit.
- DMARC: Tells receiving mail servers what to do when an email fails SPF or DKIM — report it, quarantine it, or reject it outright. Without DMARC, passing SPF and DKIM still doesn't fully protect you from domain spoofing.
Setting It Up
- Go to Settings → Sender Authentication → Authenticate Your Domain.
- Select your DNS provider from the list if it's there. This doesn't change the records — it formats the instructions for your registrar's UI.
- Enter your root domain —
yourcompany.com, not a subdomain. - SendGrid generates three CNAME records for you.
- Log into your domain registrar — Cloudflare, GoDaddy, Namecheap, Route53, wherever — and add all three records exactly as shown.
- Return to SendGrid and click Verify.
The records look something like this:
em1234.yourcompany.com         →  u1234567.wl123.sendgrid.net
s1._domainkey.yourcompany.com  →  s1.domainkey.u1234567.wl123.sendgrid.net
s2._domainkey.yourcompany.com  →  s2.domainkey.u1234567.wl123.sendgrid.net
DNS propagation is where most people panic and break things. On Cloudflare it's 15 minutes. On older registrars it stretches to 48 hours. If verification fails immediately after you add the records, just wait — don't add them again. Duplicate CNAME records cause indefinite verification failure and are annoying to clean up.
One registrar-specific trap worth flagging: some registrars automatically append your root domain to whatever you enter in the DNS field. If you paste em1234.yourcompany.com and it silently becomes em1234.yourcompany.com.yourcompany.com, verification will never pass. If yours does this, enter only the subdomain portion — just em1234.
DMARC — SendGrid Won't Add This For You
SendGrid handles SPF and DKIM through those three CNAME records. DMARC is your responsibility. Add this TXT record manually:
Record type: TXT
Host/Name: _dmarc.yourcompany.com
Value: v=DMARC1; p=none; rua=mailto:dmarc@yourcompany.com
Start with p=none — monitoring mode. Mail servers will report DMARC failures without blocking anything. Once you've confirmed your legitimate emails are passing SPF and DKIM cleanly, move to p=quarantine or p=reject. Jumping straight to p=reject before you know everything's aligned is how you accidentally black-hole your own email on a Friday afternoon.
Step 3 — Generate Your SendGrid API Key
Go to Settings → API Keys → Create API Key, or find the same screen through Email API → Integration Guide.
SendGrid gives you three permission levels:
| Level | What It Does | When to Use It |
|---|---|---|
| Full Access | Every permission, no restrictions | Local testing only. Never production. |
| Restricted Access | You choose exactly which scopes to grant | Always in production |
| Billing Access | Billing management only | For accounting tools, nothing else |
For any production environment, use Restricted Access and enable only Mail Send → Full Access. If your application also manages templates or pulls delivery stats through the API, add those scopes specifically. The reasoning is identical to any access token — grant the minimum the key actually needs. When it leaks — and eventually they do — the blast radius should be as small as possible.
The key is shown exactly once. Copy it the moment it appears and store it properly — AWS Secrets Manager, HashiCorp Vault, Doppler, or at minimum a .env file where .gitignore is actually doing its job. SendGrid actively scans public GitHub repositories for exposed API keys and revokes them automatically. This is documented, it happens regularly, and it's not worth testing.
# .env — confirm this is in .gitignore before you do anything else SENDGRID_API_KEY=SG.xxxxxxxxxxxxxxxxxxxx.xxxxxxxxxxxxxxxxxxxxxxxxxxxxxxxxxxxxxxxxxxx
Step 4 — SMTP Relay Configuration {#step-4-smtp-setup}
If you're connecting SendGrid to a platform, CMS, or legacy system that only speaks SMTP rather than a REST API, these are the settings:
| Setting | Value |
|---|---|
| SMTP Host | smtp.sendgrid.net |
| Port | 587 (TLS/STARTTLS — use this) or 465 (SSL) |
| Username | apikey |
| Password | Your SendGrid API key |
| Encryption | TLS on port 587 |
The username field trips up almost everyone the first time. It is not your account email. It is not your SendGrid login. It is literally the string apikey — five lowercase characters, no quotes, no spaces. Your actual API key goes in the password field. If your SMTP connection is failing and you can't isolate why, check this first.
Port 25 shows up in older tutorials everywhere and almost never works on modern cloud infrastructure. AWS, GCP, Azure, and DigitalOcean block outbound port 25 by default to prevent spam abuse. Use 587. Port 465 works too but is a deprecated standard — still widely supported, just not where the industry has landed.
Verify SMTP Before You Wire It Into Anything
curl --ssl-reqd \ --url 'smtps://smtp.sendgrid.net:465' \ --user 'apikey:YOUR_API_KEY_HERE' \ --mail-from 'sender@yourcompany.com' \ --mail-rcpt 'recipient@example.com' \ --upload-file - <<EOF From: Sender <sender@yourcompany.com> To: Recipient <recipient@example.com> Subject: SendGrid SMTP Test Testing SendGrid SMTP relay. EOF
250 Ok: queued as... means it's working. Anything else is either wrong credentials or a port block at the network layer — check your firewall rules before you start second-guessing the SendGrid config.
Step 5 — Send Your First Email via API
For anything beyond a CMS integration, the REST API is cleaner than SMTP. Better error messages, easier retry logic, and you get access to the full feature set — dynamic templates, recipient personalisation, send scheduling, suppression management.
Minimal working implementations in the three most common server-side languages:
Python
import os from sendgrid import SendGridAPIClient from sendgrid.helpers.mail import Mail message = Mail( from_email='noreply@yourcompany.com', to_emails='user@example.com', subject='Welcome to the platform', html_content='<strong>Thanks for signing up.</strong>' ) try: sg = SendGridAPIClient(os.environ.get('SENDGRID_API_KEY')) response = sg.send(message) print(response.status_code) # You want 202 here except Exception as e: print(str(e))
Node.js
const sgMail = require('@sendgrid/mail'); sgMail.setApiKey(process.env.SENDGRID_API_KEY); const msg = { to: 'user@example.com', from: 'noreply@yourcompany.com', subject: 'Welcome to the platform', html: '<strong>Thanks for signing up.</strong>', }; sgMail .send(msg) .then(() => console.log('Email sent')) .catch((error) => console.error(error.response.body.errors));
PHP
require 'vendor/autoload.php'; $email = new \SendGrid\Mail\Mail(); $email->setFrom("noreply@yourcompany.com", "Your App"); $email->setSubject("Welcome to the platform"); $email->addTo("user@example.com"); $email->addContent("text/html", "<strong>Thanks for signing up.</strong>"); $sendgrid = new \SendGrid(getenv('SENDGRID_API_KEY')); $response = $sendgrid->send($email); echo $response->statusCode(); // You want 202
A 202 Accepted means SendGrid queued the email. It does not mean the email was delivered. It does not mean it hit the inbox. For actual delivery confirmation — which you need in any production system — you need event webhooks, covered below.
Step 6 — WordPress Setup with WP Mail SMTP
WordPress sends email using PHP's built-in mail() function. On shared hosting, VPS environments, and most cloud platforms, this either fails silently or produces unauthenticated emails that get flagged before they even leave the server. The issue has nothing to do with your content — it's the sending infrastructure. Your emails are going out with no authentication, from an IP with no established reputation, and receiving mail servers treat them accordingly.
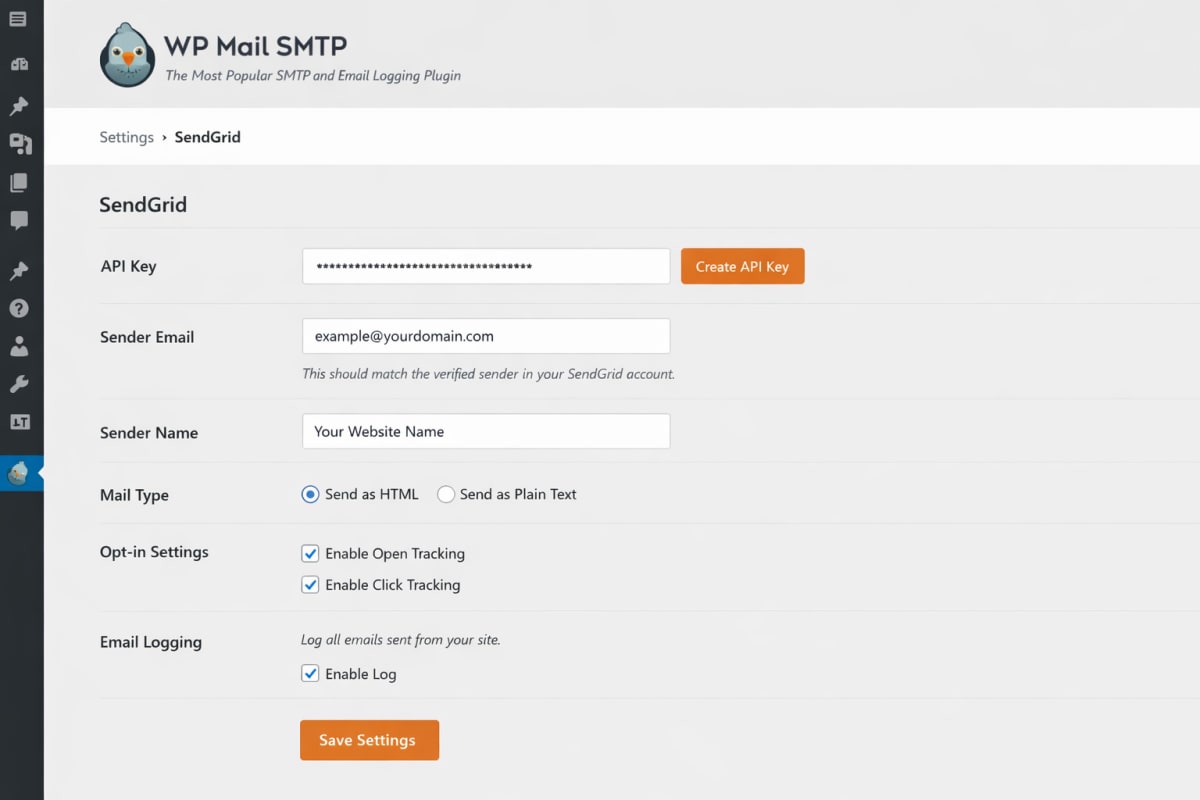
The cleanest fix is the WP Mail SMTP plugin wired to SendGrid.
Setting It Up
- Install WP Mail SMTP from the WordPress plugin directory and activate it.
- Go to WP Mail SMTP → Settings → Mailer and select SendGrid from the list.
- Paste your SendGrid API key into the API Key field — the Restricted Access key with Mail Send permissions from Step 3 works perfectly here.
- Set the "From Email" to your domain-authenticated address. Same domain you verified in Step 2.
- Save settings.
- Go to WP Mail SMTP → Tools → Email Test and send a test to an inbox you can actually check.
That's the whole integration. WooCommerce order confirmations, password reset emails, membership notifications, Contact Form 7 submissions, Gravity Forms entries — all of them use wp_mail() under the hood. Once WP Mail SMTP is configured, they all route through SendGrid automatically without touching anything else.
Three things that trip people up:
- WooCommerce emails going to spam: Nine times out of ten this is a domain authentication problem, not a plugin problem. Go back and confirm the green checkmarks in SendGrid's Sender Authentication dashboard.
- "From" address mismatch warnings: The from address in WP Mail SMTP has to match the domain you authenticated. You can't authenticate
yourcompany.comand send fromnoreply@subdomain.yourcompany.comwithout also authenticating that subdomain separately. - Test email works, production emails don't: A security or caching plugin is probably blocking outbound API calls. Wordfence does this. Disable it temporarily to confirm, then whitelist the SendGrid API endpoint.
Improving Deliverability — What Actually Matters
Getting the integration working is step one. Getting your emails to reliably land in the inbox is a completely different problem — and the one that catches teams after they've already deployed to production and told everyone that email is handled.
Shared IPs Are a Real Risk on Essentials
On the Essentials plan, your emails share an IP address with thousands of other SendGrid customers. When one of them starts sending spam, gets flagged, and tanks the shared IP's reputation, you inherit those consequences. Delivery rates drop. Emails start hitting spam folders. You have no way to fix it because it's not your IP to fix.
This isn't a theoretical edge case. In early 2025, there were multiple well-documented reports of Outlook and Hotmail delivery failures caused by bad actors on SendGrid's shared IP pools. The affected senders had done nothing wrong. They just had terrible neighbours on a shared IP and had no recourse.
A dedicated IP — included in Pro, or $30/month as an add-on — means your sending reputation is entirely yours. Nobody else's mistakes can touch it. Past 25,000 emails a month it's worth it. Past 50,000 it's not really optional.
One caveat worth taking seriously: a brand-new dedicated IP has zero reputation. You have to warm it up. Start at 500–1,000 emails per day and build the volume gradually over 4–6 weeks. Sending 50,000 emails on day one from a cold IP is a textbook spam signal that will undo everything else you've configured correctly.
Why Your Emails Are Actually Going to Spam
- Domain authentication is missing or broken. The most common cause, by a wide margin. The API key works, the 202 comes back, but nobody ever added the CNAME records.
- Bounce rate above 5%. SendGrid watches this number. A sustained high bounce rate will get your account throttled and eventually suspended. Clean your list before any high-volume send.
- Low engagement signals. Gmail and Outlook factor in open and click rates at the domain level. If you're sending to addresses that never engage, your domain reputation quietly degrades over time without any obvious warning sign.
- Erratic sending volume. Going from 50 emails a day to 100,000 overnight looks exactly like a spam operation to ISP filters. Ramp up gradually.
- Missing List-Unsubscribe header on bulk sends. Required for anything resembling marketing email. SendGrid's Marketing Campaigns tool adds this automatically. Custom transactional flows don't — you have to handle it yourself.
Monitoring with Analytics and Event Webhooks
The SendGrid Activity Feed gives you real-time visibility into every email — delivered, bounced, opened, clicked, spam-reported. Free plan gives you 3 days of history. Essentials gives you 7. Pro gives you 30.
For debugging a specific incident, the Activity Feed is fine. For production systems at any meaningful scale, you want data pushed to you, not a dashboard you remember to check only after a user complaint.
Event Webhooks — Stop Polling, Start Listening
SendGrid can POST a JSON payload to any endpoint you own every time something happens to an email — delivered, bounced, spam-reported, link clicked. This is how you close the loop between "SendGrid accepted the email" and "the user actually got it."
Set it up in Settings → Mail Settings → Event Webhook. Enter your endpoint, select the events you care about, enable it.
app.post('/api/sendgrid/webhook', express.json(), (req, res) => { const events = req.body; events.forEach(event => { switch (event.event) { case 'bounce': // Stop sending to this address. Update your database. console.log(`Bounce: ${event.email} — ${event.reason}`); break; case 'spamreport': // Unsubscribe immediately. Don't wait. console.log(`Spam report: ${event.email}`); break; case 'delivered': // Update delivery status in your records. break; } }); res.status(200).send('OK'); });
Handling bounce and spam report events is not optional at production scale. If you keep sending to hard-bounced addresses, SendGrid will step in by throttling your account before you notice the problem yourself. Own that logic rather than let it become their problem.
Common SendGrid Setup Problems and How to Fix Them
Domain authentication isn't verifying
What you see: "Verification failed" right after adding CNAME records.
What's actually happening: Either propagation hasn't finished yet, or your registrar has a formatting issue. Check propagation at dnschecker.org first. If the records aren't showing globally, just wait. If they're showing but SendGrid still fails, look for the registrar auto-append trap — some registrars silently turn em1234.yourcompany.com into em1234.yourcompany.com.yourcompany.com. If yours does this, enter only the subdomain part.
401 Unauthorized from the API
What you see: {"errors":[{"message":"The provided authorization grant is invalid..."}]}
What's actually happening: The key is wrong, was revoked, or is missing the Mail Send scope. Generate a new key with explicit Mail Send permissions and try again. Also confirm you're passing it as a Bearer token — Authorization: Bearer SG.xxxxxx, not Authorization: SG.xxxxxx. The missing word "Bearer" has probably wasted more combined developer hours than anyone at SendGrid wants to acknowledge.
Activity Feed says "Delivered" but the email is in spam
This one frustrates people because it feels like a contradiction. "Delivered" in SendGrid's terminology means the receiving mail server accepted the message. It says nothing about what that server decided to do with it afterward.
Work through this checklist in order: Is domain authentication showing green checkmarks in Sender Authentication? Does your email content trigger spam filters — run it through mail-tester.com to find out. Are you on a shared IP with reputation problems? If you have Pro, temporarily switch to your dedicated IP to isolate whether the issue is IP-level or content-level.
Account stuck in "provisioning"
New SendGrid accounts go through automated compliance screening. Most clear in minutes. If yours has been stuck for more than 24 hours, a flag triggered manual review. Contact support with your website URL, a clear description of what you're sending, and a few example emails. Legitimate use cases typically resolve in one to two business days.
Hitting rate limits on large sends
The SendGrid API handles up to 3,000 requests per second globally. If you're doing a bulk send by firing API calls in a tight loop, you will hit this ceiling. Build a proper send queue with throttling logic. The API is not a firehose.
SendGrid vs. The Alternatives — Honest Comparison
We'd be doing you a disservice if we closed out this sendgrid setup guide without addressing the question that's probably sitting in the back of your head.
Best for: General SaaS, high volume
Free tier: 100 emails/day · Dedicated IP: Pro plan ($89.95/mo)
Best for: Deliverability-first transactional email
Free tier: 100 free emails · Dedicated IP: From $50/mo
Best for: Developers, EU data compliance
Free tier: None (trial only) · Dedicated IP: From $35/mo
Best for: Raw cost efficiency, AWS users
Free tier: 62K/mo on EC2 · Dedicated IP: $24.95/mo
Best for: Modern dev experience, small teams
Free tier: 3,000/mo forever · Dedicated IP: $20/mo add-on
Pick SendGrid if you want battle-tested infrastructure with an SDK for every language your team uses, you're already in the Twilio ecosystem, or you need the hybrid of transactional and marketing in one platform.
Pick Postmark if inbox placement is the metric you actually lose sleep over. Postmark's entire business is built around one thing — getting transactional email into the inbox reliably. If you've had repeated shared IP problems on SendGrid Essentials and can't justify Pro yet, Postmark is the honest alternative.
Pick Amazon SES if you're running serious volume inside the AWS ecosystem and the cost difference actually matters to your unit economics. At $0.10 per 1,000 emails, it's ten times cheaper than SendGrid at scale. The setup is rougher, the tooling is less polished, and when something breaks the support is essentially a documentation site you've already read. We went deep on all of it in our Amazon SES review — worth reading before you make any decision based primarily on price.
Pick Resend if you're a solo developer or small team who wants the cleanest API experience available right now and a free tier that's actually liveable. Resend is what SendGrid would look like if someone built it from scratch today. The tradeoff is maturity — younger platform, less enterprise infrastructure behind it, something to weigh seriously if email is on the critical path for your revenue.
Pick Mailgun if you have GDPR data residency requirements that demand EU-based infrastructure. SendGrid has no equivalent option. Mailgun also handles inbound email parsing significantly better if that's part of your product.
Final Verdict
SendGrid works. Not in a "technically meets requirements on paper" way — it genuinely works, it's been doing this for over a decade, and the infrastructure has earned its reputation.
The failures you'll read about in forum threads are almost never the platform's fault. They're setup mistakes — skipped domain authentication, bounces ignored until the account got throttled, a fresh dedicated IP hammered at full volume from day one. The platform doesn't protect you from your own configuration errors. Nothing does.
Do the domain authentication before anything touches production. Write the bounce and spam report handling logic before you call the email feature shipped. Past 25,000 emails a month, make the case internally for Pro — the dedicated IP is worth more than the price delta.
That's the real sendgrid setup guide. Not the one that ends after the 202 response comes back.
Related Reading
- Amazon SES Review — Is It Worth the Setup Complexity?
- SendGrid vs Amazon SES — Which One Should You Actually Use?
Pricing last verified March 2026 against SendGrid's public pricing page. Confirm current pricing at sendgrid.com/pricing before committing to a plan.